
Help & Instructions
Educational Articles
Saw-Cut Loop Tips and Tricks

There is always a quicker way to complete the job, we wanted to share some little industry tips and tricks to make your next saw-cut loop installation easier. The purpose of this article is to list some tricks that have saved installers time installing saw-cut loops. These tips should benefit new and veteran installers alike giving them an edge over the competition. This article has a tip designed to save time at every step of the saw-cut installation process.
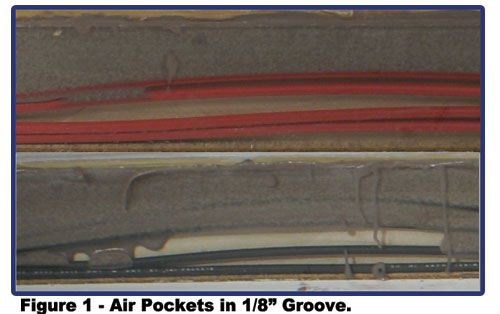
To install a saw-cut loop, a groove must be cut. Choosing the correct size saw-blade is important to insure there is enough space for sealant to properly flow when applied. A 1/8” blade cuts a groove too narrow for thick sealant to properly flow and encapsulate the saw-cut wires. A 3/16” blade or larger has enough space for sealant to flow. BD Loops recommends the use of a 3/16” saw blade, 3/16” blades cost less, put less bog on your saw-cut machine, and require 25% less loop sealant to fill than a ¼” groove. If the sealant doesn’t flow properly air pockets will form within the saw-cut groove, a leading cause in loop failures. (View BD Loops’ Groove Test Here)
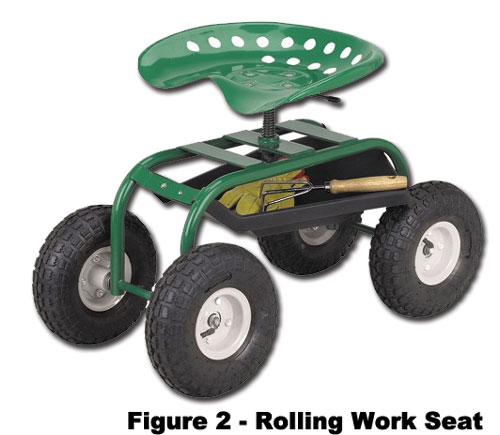
There are a lot of methods used to clean and dry a saw-cut groove, some better than others. Cleaning and drying a groove of water and debris is very important if you want to install a loop properly according to industry standards. If a loop is installed in a groove that is wet and filled with debris the wire has a high chance of becoming nicked, and loop sealant will not harden properly or air bubbles may form. The use of a tool that centralizes air flow like the BD Loops groove cleaning air wand or similar tool is the best way to clean out and quickly dry a saw-cut groove (See Figure 3). Sucking up water and debris with a shop vacuum or using a leaf blower to dry the groove takes more time, but is more efficient that letting the sun air dry the groove.
Installing a saw-cut loop can be as easy a dropping it into the groove if a preformed saw-cut loop is used. Wrapping loops by hand is time consuming. Using a BD Loops preformed saw-cut loop means you don’t have to wrap the loop in the field, twist the lead-in wires, make a wider saw-cut groove for twisted lead-in, and you don’t have to install backer rod. BD Loops has the most reliable loops in the industry because all the connections in the loop are soldered, the seal is water tight, and each loop is tested 3 ways before leaving the factory.
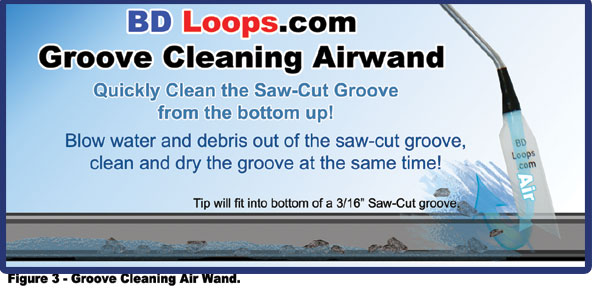
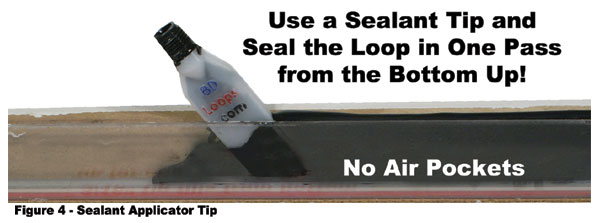
Once the loop is in place a loop sealant should be applied. The use of a DOT approved loop sealant like Chemque, Bondo, or Ruscoe brand loop sealant will save a lot of time in installation and prevent early replacement. These brands have a low viscosity, don’t crack over time, and have tools designed for them to make the installation process much easier. Tools like sealant tips, if the proper tip is used the groove can be sealed from the bottom up allowing a seal with just one pass. Normal methods require multiple passes because time must be given for the thick sealant to flow around the wires. (See Figure 4) BD Loops found that 15-20 minutes per loop can be saved in the sealant application step with the use of a properly sized sealant tip. Loop sealant is often applied with the installer on their hands and knees, save your knees and back by using a rolling work seat (sometimes called rolling garden seat, (See Figure 2). Rolling work seats can be found at stores like Harbor Freight and Home Depot.
Loop sealants take time to harden you can leave the job quicker and looking nicer by always having some different colored sand on your truck. Colored sand is inexpensive and commonly found at hobby stores. After the groove is filled with sealant sprinkle some sand on top choosing a color that matches the surface material. This will allow the lane to be opened earlier, before the sealant has fully hardened. Applying sand is also a good trick if the only color of loop sealant available is black when installing into a light colored surface such as concrete. By mixing both white and brown sand the color of concrete can be mimicked and better conceal the loop tattoo. Read our detailed article on the sand trick here.
Every minute counts, I hope you walk away with some new tricks to save you time in your next installation. If you would like to share your time saving tricks and make the job easier for installers in the industry, email BD Loops at: team@bdloops.com.
BD Loops
The Loop Experts!
BD Loops was founded in 2001. Their preformed loops and accessories are designed with the installer in mind. BD Loops offers a complete loop system solution including preformed direct burial loops, preformed saw-cut loops, loop sealant, blades, testing devices, and installation tools. BD Loops has a reputation for reliability and ease of installation. They pride themselves on the quality of their products and their commitment to providing excellent customer service and support. BD Loops preformed loops are made in the USA at their facility in Placentia, CA.