
Help & Instructions
Loop Sealant Tips and Tricks

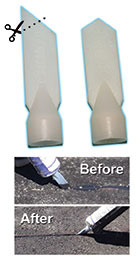
Use the back of an empty tube to clean up any sealant overflow.
It can be hard to make your sealed loops look nice, this simple trick cleans up excess loop sealant and leaves crisp clean sealed grooves.
When you are finished sealing the loops, simply take an empty sealant tube and scoop up any overflow or messy looking loop sealant into the back of the tube. It only takes a minute or two to run the tube of sealant over the loop and lead-in. This simple trick leaves clean, even sealed grooves and works better than using cardboard to pick up excess loop sealant.
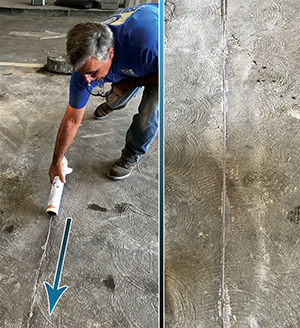
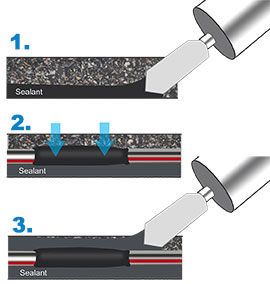
Use a sealant with a flat sealant tip to seal loops in one pass from the bottom up!
No waiting around for the sealant to seep down into the groove, no second passes with sealant.
Using a modified flat sealant tip to allow the sealant to flow more easily and evenly into the groove.
Every tube of BD-LG comes with a modified sealant tip, but if you are using a different brand of loop sealant with a flat tip, this little trick makes sealing loops much easier.
Installing loops on a cold day?
Most loop sealants will thicken up when they are stored in cold temperatures, if you know that you are heading out to a cold job site keep your sealant in the truck under your foot heaters, or place it on the hood of your truck to keep it warm.
Installing loops in very cold or freezing weather?
I’m sure you already know that it takes loop sealant a very long time to cure in freezing or near freezing temperatures. There are better sealants for installing in very cold temperatures, we even offer one: BD-LG2 a 2 part polyurethane loop sealant with a 15-45 minute cure time. This type of sealant is ideal for freezer door applications, or any jobsite where the temperature is under 68° F at time of installation.
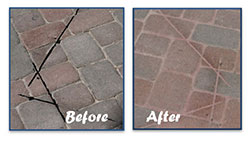
Cutting loops into a decorative driveway?
The sand technique is ideal for situations where you are forced to cut into prettier surfaces such as stamped concrete, stamped asphalt, fresh concrete, pavers, or any application where the driveway appearance is important to the customer. All you need is colored sand from a hobby store (to match the driveway) and play sand. Best of all – it allows you to open the lane earlier since the sand creates a barrier over the sticky loop sealant. To learn more about this handy trick visit the sand trick page!
Determine how much sealant you need for your jobsite – sealant charts.
On the back of every tube of BD-LG there is a sealant coverage chart, we also have in-depth guides online at www.BDLoops.com. Make sure you order a tube or 2 more than you anticipate you’ll need. You never want to be running back to your distributor just to pick up a tube of sealant to finish a job.
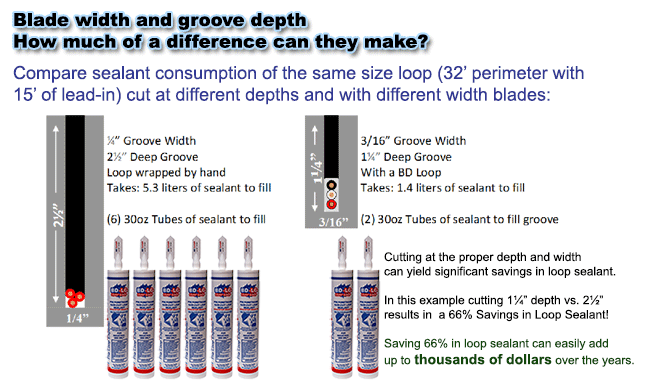
Use a 3/16” blade to save 25% in sealant (vs. a ¼”blade).
3/16” wide blades are 25% narrower than ¼” blades. This means that if you cut your loops with a 3/16” blade, you will use 25% less loop sealant to seal the loops. Make sure you do not cut deeper than 1 ½” inches (we recommend cutting the grooves 1 ¼” deep) to use less loop sealant. We know how expensive loop sealant can be!
Fully seal the yoke area for an added level of protection.
This simple installation technique adds a whole layer of protection to the saw-cut loop. By completely encasing the loop yoke in sealant you add an additional layer of protection to the saw-cut loop. This simple trick takes less than a minute, and adds a barrier of protection to your loop.
You Might Find These Related Articles Interesting:
BD Loops
The Loop Experts!
BD Loops was founded in 2001. Their preformed loops and accessories are designed with the installer in mind. BD Loops offers a complete loop system solution including preformed direct burial loops, preformed saw-cut loops, loop sealant, blades, testing devices, and installation tools. BD Loops has a reputation for reliability and ease of installation. They pride themselves on the quality of their products and their commitment to providing excellent customer service and support. BD Loops preformed loops are made in the USA at their facility in Placentia, CA.